


As we enter another period of lockdown, and school buildings are closing to all but the children of key workers, many teachers will be getting prepared for delivering lessons online again. I’ve been running some sessions with my student teachers and their mentors on approaching online learning, so I thought I’d share some of the content here.
There’s several different models for online learning:
Synchronous learning is when we’re all learning at the same time but in different places. These are usually Live Lessons. The teacher is broadcasting to a group of children and able to engage and interact with them in real time.
Asynchronous learning is when we’re learning at different times and different places. This can include using Pre-recorded lessons, bundles of work sent home or made available via a platform such as Google Classroom. You can record lessons using tools like Loom. You can even set up a Zoom meeting that only you attend, screen share and then record the meeting locally. Works well.
There’s also Blended Learning – which is a mixture of both of the above. There might be a pre-recorded session and a bundle of work for children to access. This can then be backed up by a live session where children can ask for support for the teacher. Good distance learning will often incorporate a blended learning approach.
According to research by the EEF, live lessons (synchronous) are not necessarily any more effective than recorded (asynchronous). Both have strengths & weaknesses – and some school contexts mean the former is not viable.
Flipping the Classroom is a teaching technique that can be applied to online learning. Provide the students with activities to carry out before the teaching session. This could be content to read, videos to watch, activities to do. They then take part in an online lesson (live or recorded) which builds on this
Hints and Tips
Give an agenda or plan for each class by Screen Sharing a document or slide at the beginning of class. This gives students a clear idea of how the class will progress, what will be covered, and the activities they’ll engage in. Discuss online etiquette and expectations of the students in your first virtual class and periodically revisit the topics.
Doug Lemov describes “Dissolving the Screen” as a technique to make students feel more connected. Show your face and lean into the screen. Try to show your enthusiasm for the content. Be engaging, pretend the screen isn’t between you. Look at the camera to create eye contact with your students. This helps to create a more personal connection while teaching over video.
Keep sessions short where possible. Don’t try and replicate the school day online with five or six hours of online content. It is exhausting for everyone. Keep the sessions to about 15 or 20 minutes. Set up tasks for them to do, then revisit with another session later. Remember children at home may have to share devices with siblings or even parents. You can’t guarantee every child will have their own device all day, every day.
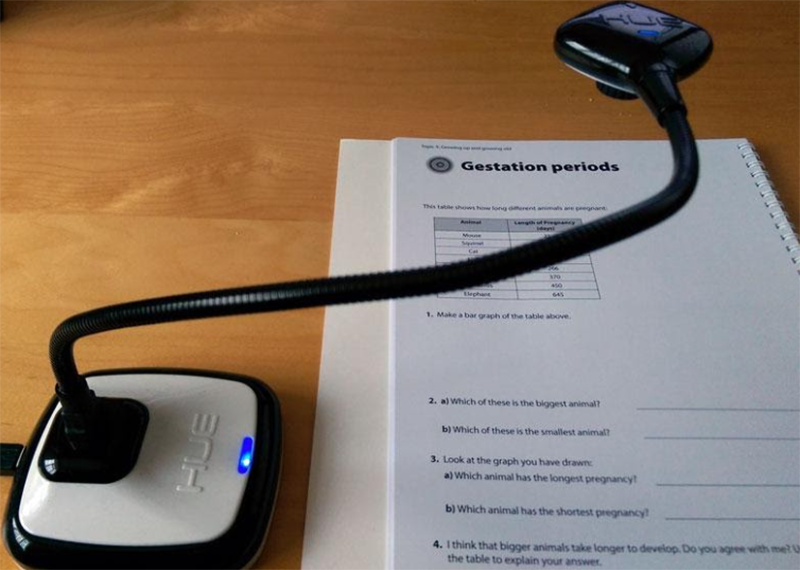
Get a visualiser. You don’t need to break the bank, good visualisers (or document cameras) can be picked up for about £40. The Hue range is pretty good (Amazon) as a starter. If you have a spare, older webcam, you can use that instead. Just rig it up to point downwards (got any spare Lego? Make a stand with that!). Some phones can work well as visualisers too. If you’ve got a recent Samsung phone and Windows 10 you can use the YourPhone app to display your phone screen on the computer. You could also use an iPad/iPhone and Reflector/Airserver software. iPevo also make software that allows your phone to act as a visualiser.
Check your computer microphone is up to the job. You can buy cheap lapel mics from Amazon for about £10 if you need something better.
Utilize the Whiteboard tool or annotate a shared document and let your students engage as well. I’ve had success using Google Jamboard on my iPad as a whiteboard which I can annotate with a stylus on my desk, while at the same time sharing the Jamboard with students so they can see the annotations. It’s easier than trying to draw with a mouse. You could also use a regular whiteboard – hold it up to the webcam or put it under the visualiser. The solutions don’t always have to be high-tech!
Include ‘pause points’ to allow students to interact and engage in the content. Take time to promote questions, comments, and reactions from your class. Give a minute to allow your students to utilize reactions, write their questions in chat, or be unmuted to ask their questions live.
Divide into smaller groups for a discussion on a certain topic. If your platform has it you can use the Breakout Room feature to either pre-assign or auto-assign students into groups for a short period of time so they may discuss things together. Peer interaction is important during remote learning, as a way to motivate pupils and improve outcomes. Set up collaborative documents in Google Drive or Dropbox for the students to access in groups.
Ensure the elements of effective teaching are present – for example clear explanations, scaffolding and feedback. Use cold calling – engage students by name. Useful to keep them engaged even if their cameras are off. Read the Room – when you don’t need to share your screen, stop sharing so you can see the gallery of all the students. It’s easier to talk to them when you can see them!
Paul Kirschner’s Tips for Emergency Remote Learning
Paul’s top tips include:
- Limit distractions
- Stick to the essentials
- Bite-size chunks of learning and practice
- Communicate goals and success criteria
- Frame new material in the bigger picture
- Use relevant prior knowledge
- Give examples before exercises
- Offer support and guidance during practice
DFE Guidance
- Keeping children safe in education: statutory guidance for schools and colleges on safeguarding children. Annex C of the document has information related to online safety.
- Safeguarding and remote education during coronavirus (COVID-19) guidance explains how to follow safeguarding procedures when planning remote education strategies and teaching remotely. This includes advice on virtual lessons and live streaming and the data protection toolkit for schools.
- Get help with remote education guidance provides information and support for teachers and leaders on educating children during the coronavirus outbreak.



At this time tips about maximising online learnign are really useful – thanks for this info!